
Screen Configuration
Propresenter screen configuration is based around 2 main parts, screens and themes. This page will mainly focus on screens.
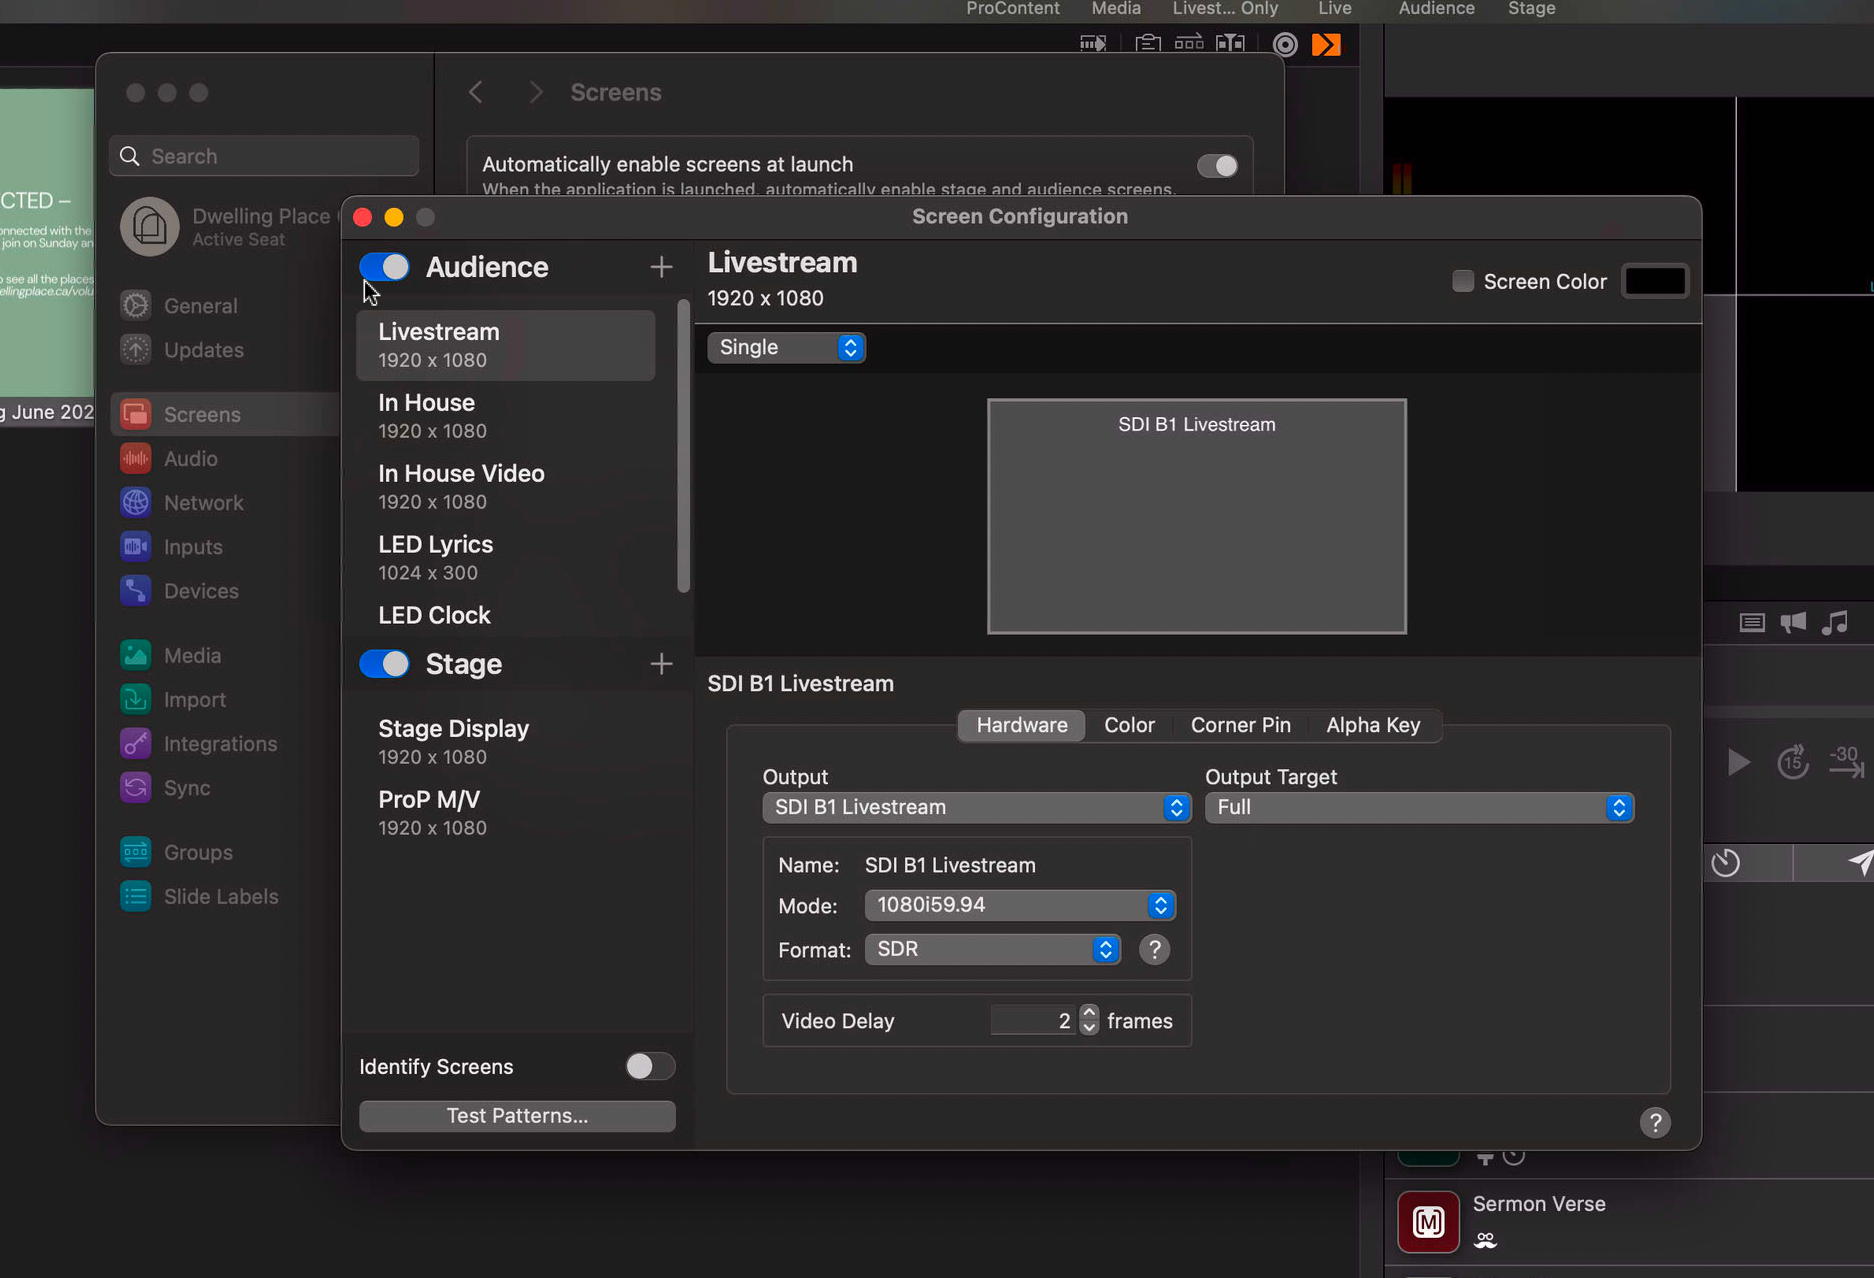
There are two kinds of screens in ProPresenter, Audience screens and Stage screens. Audience screens are pretty self explanatory, and Stage screens are the screens that are fed to the technical/stage crew. Let's start with Audience screens.
Audience Screens
Audience screens (do you think I've said it enough times?) are rendered at a higher priority than Stage screens. In theory, this means that their output will be smoother than others, but this doesn't always hold true in practice (computers are complicated apparently). If you look at the screen sizes underneath the screen names, you may notice a couple of weird ones. The lyrics are 1024x300 and the clock is 400x200. This goes to show that an output can be whatever the heck you want it to be.
I should probably explain what each of the outputs is. In order,
- Livestream is the graphics feed that goes to the livestream. This is a pair of outputs, as it also outputs an alpha layer (we'll get into that later)
- In House is a feed that goes to PVP. It handles putting images, sermon slides, and verses up on the screens. This is a virtual feed that embeds the alpha layer directly into the feed.
- In House Video is a physical feed that goes to PVP. Videos are harder to handle than basic slides, and the virtual feed struggles to keep up over the network when playing a video. We use a physical feed that does not have an alpha layer to play videos to get around this.
- LED Lyrics is the lyrics feed into PVP. It can be sent, cloned, and placed anywhere (this is how we put it in many places while also being able to put other slides up). This is also a virtual feed with alpha embedded, so that it doesn't disrupt the backgrounds.
- LED Clock is the start-of-service clock. It's a very small box with nothing but the countdown clock in it. Also a virtual feed with embedded alpha.
Stage Screens
Stage screens are the screens that go to the TV at the back of the sanctuary, and also to the broadcast room. They allow us to see what's coming up next, how much time is left in a video, or in the case of the ProP M/V, allow us to see all the other screens at once. We'll get into how those are actually configured in a minute, but yes it's possible to view other screens in a stage screen.
Output Configuration
ProPresenter has a lot of configuration you can do to modify how outputs work. You can change everything from the framerate to the colour offsets to even making larger screens by combining multiple physical outputs into one ProPresenter output (tiling). All of that can be done from here.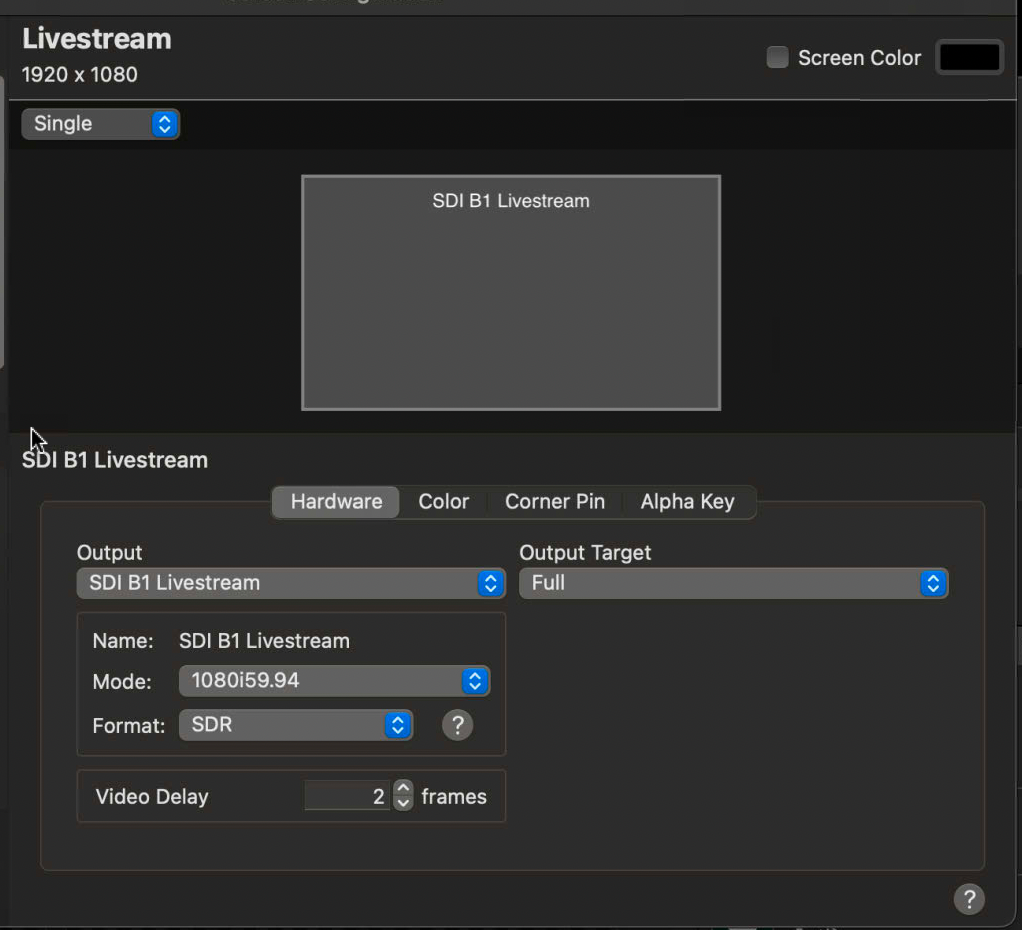
Outputs
The main thing done here is changing the output. In this case we're using SDI B1 Livestream as the output. This is an SDI output through a PCIE card plugged into the computer. B1 indicates that it's the first output on the bottom card. We can see all the available outputs by clicking on it.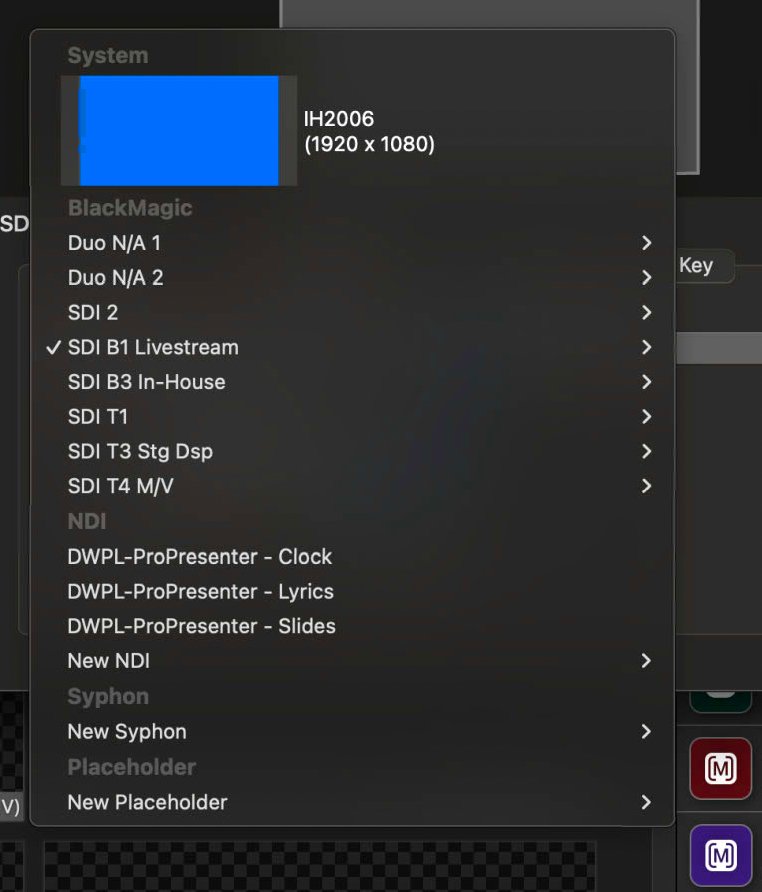
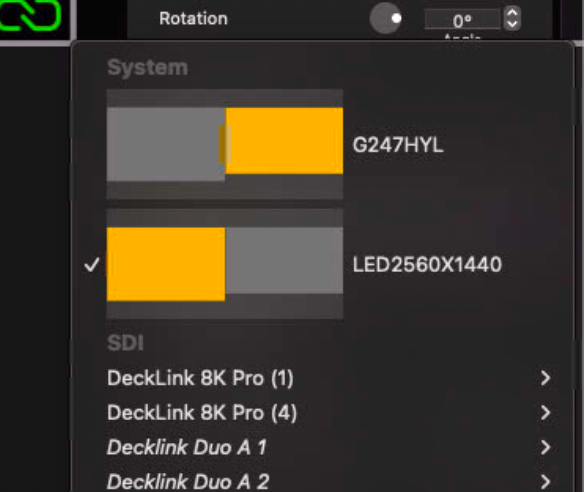
There's 3 categories of interest, we'll ignore Syphon and Placeholder (which is just as the name suggests). IH2006 is the HDMI output of the computer, which feeds the screen used upstairs. That is the system output. If we were to plug another monitor in, it would show up there. We can demonstrate this on PVP:
The BlackMagic outputs are the SDI outputs that come from the PCIE cards plugged into the computer. These feed into the rest of the broadcast system (oooo rare image of the real world):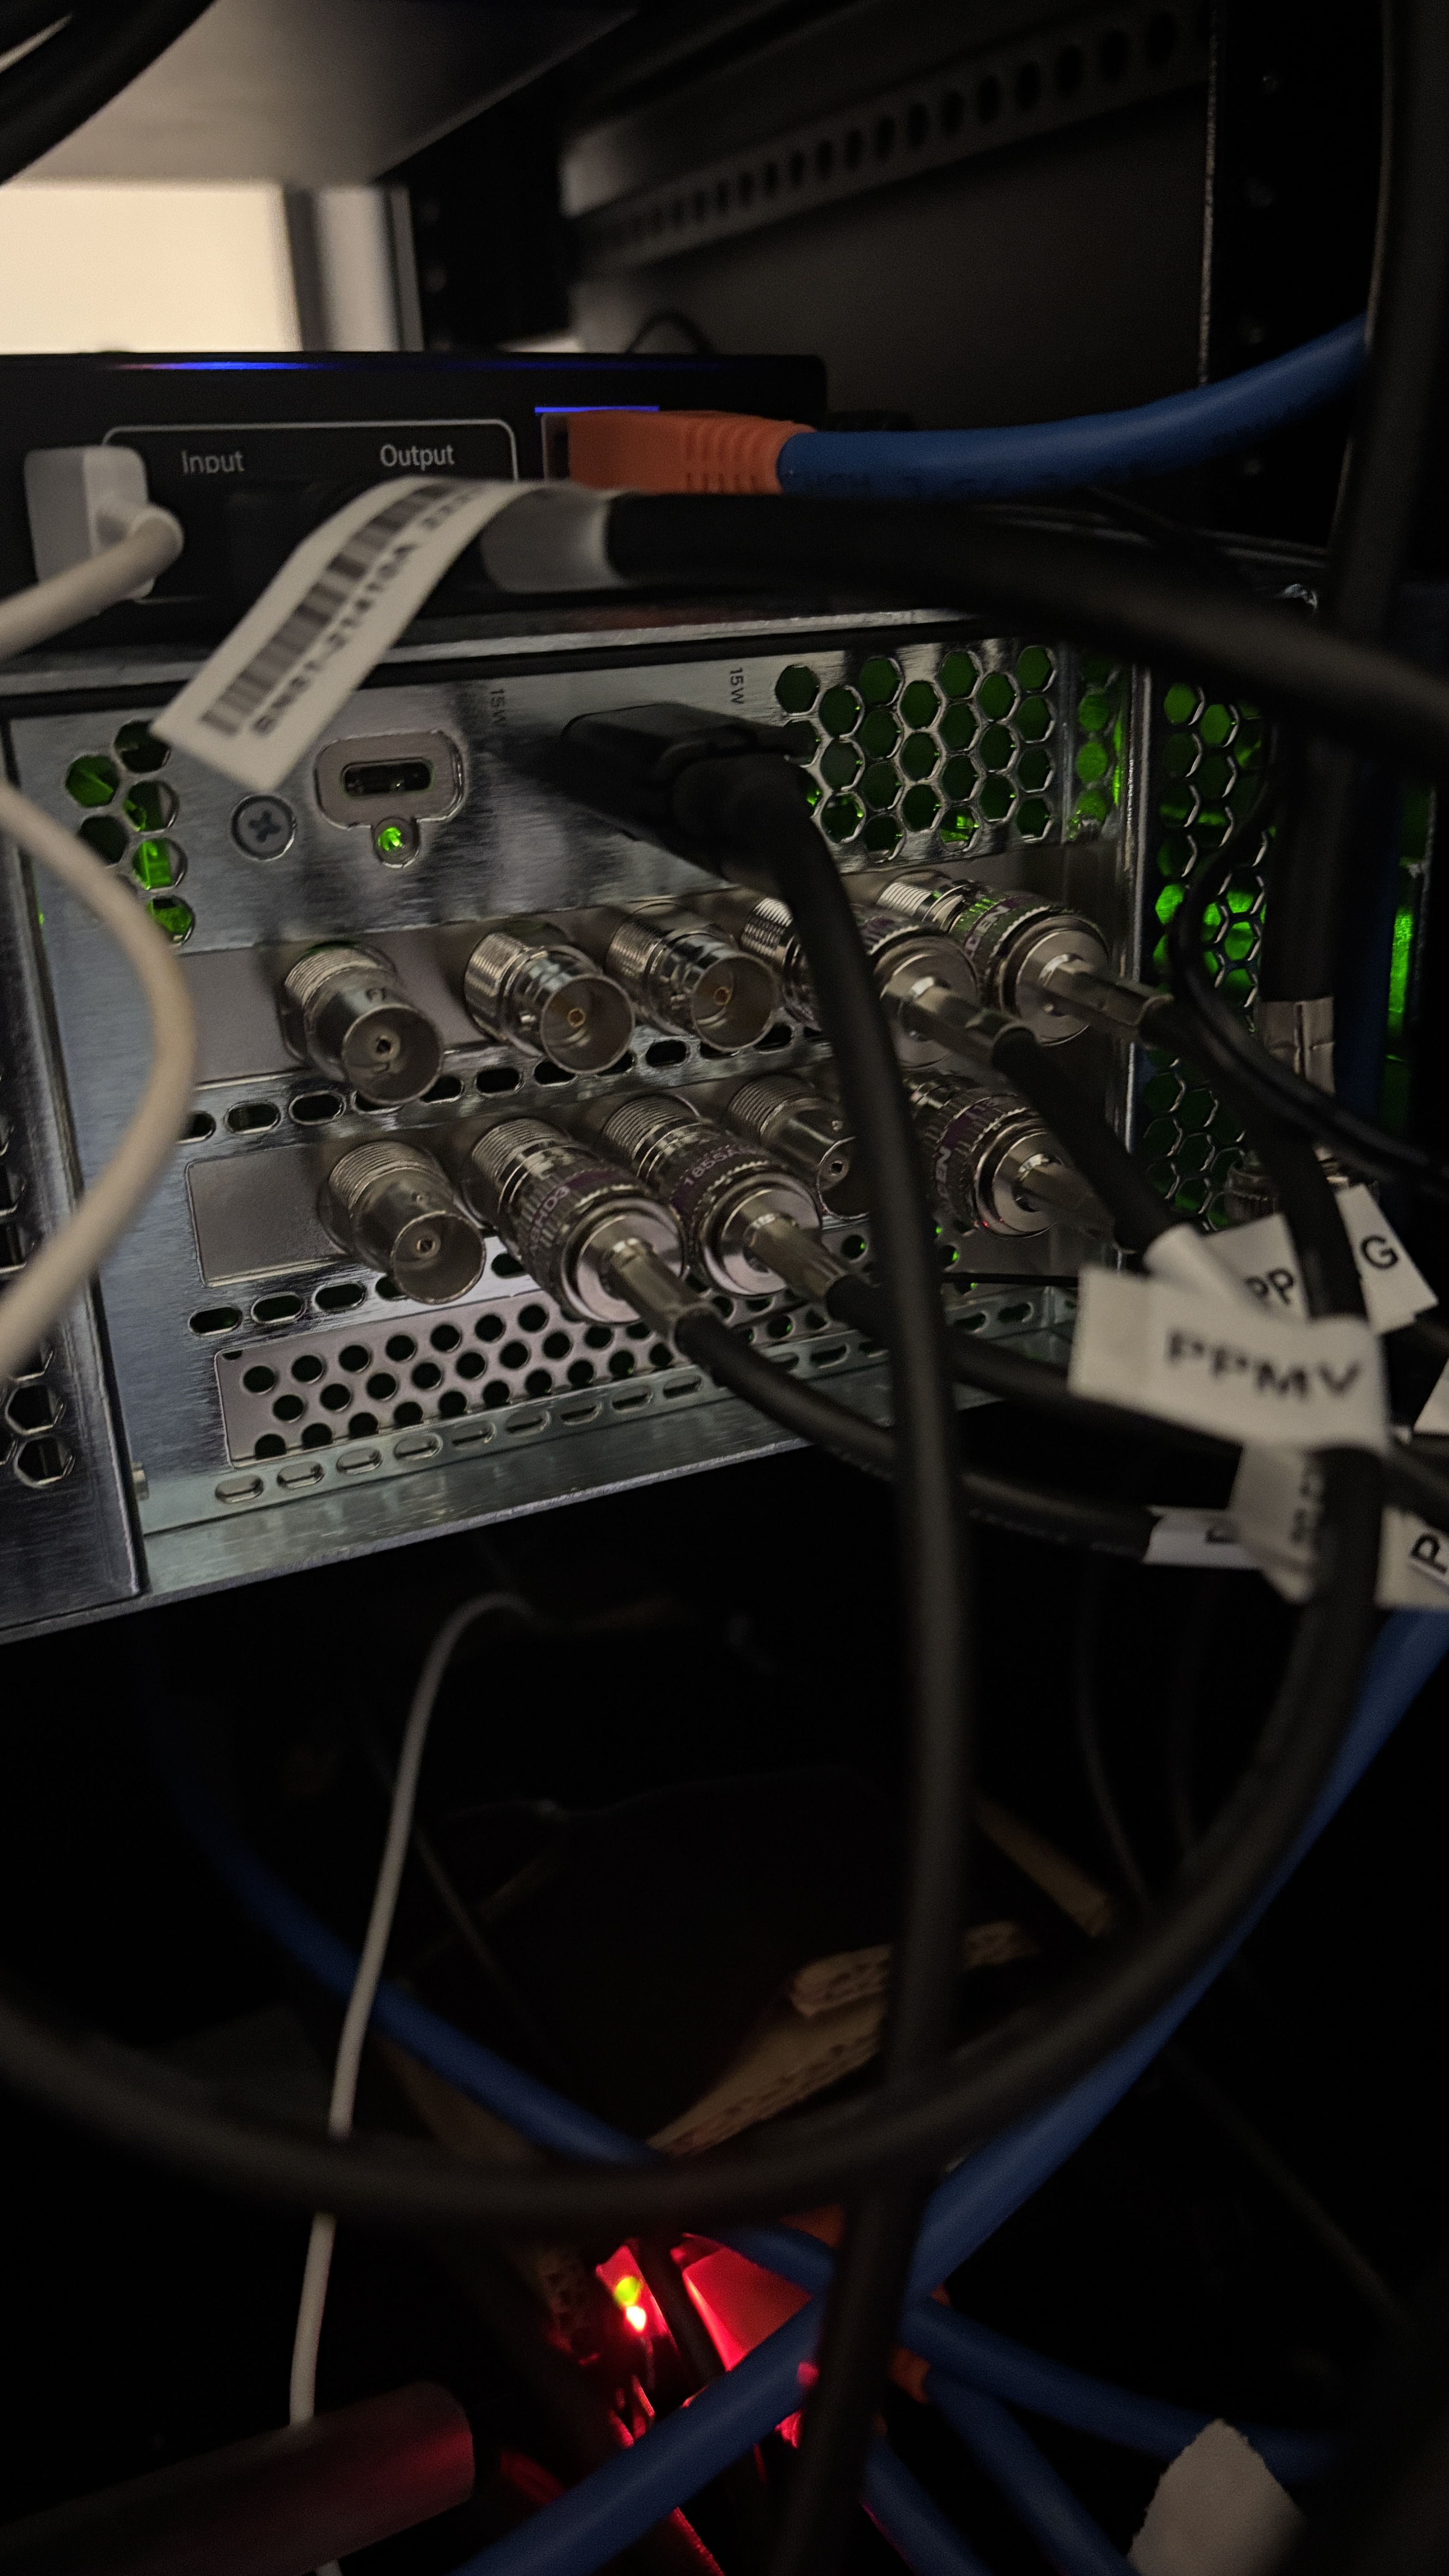
NDI is network-based virtual outputs. We have 3 of them, and they all feed to PVP. Creating these is as simple as pressing "New NDI", and the new NDI will show up on any other device on the same network. In theory this is a magical "it shows up and it just works" but this doesn't always happen. See Debugging: Connecting PVP to ProPresenter for more info on this.
That's a short explainer on the different kinds of outputs, but there's a lot more configuration to be done once you've selected an output.
Mode
The mode of the output allows you to change the speed at which frames are outputted. Some devices will only accept specific framerates (such as our broadcast switcher), so different outputs may need to have different framerates. Our broadcast rig uses 1080i59.94, which is 1080 interlaced at 59.94 frames per second.
Beside the Mode is a choice between SDR and HDR for blackmagic devices. This should always be in SDR.
Video Delay
You can choose to delay the output if there's a delay in the audio (eg. due to latency in the soundboard).
Output Target
This has to do with the output tiling i mentioned earlier. We can ignore it, and leave it on Full.
Color
If we go to the next tab, we'll find colour adjustments. This isn't particularly useful in our usecase, as none of our outputs go directly to any screens. But if we had an output that fed directly to a screen we could adjust the colour output to make it as accurate as possible.
Corner Pin
The Corner Pin tab allows us to adjust where the corners of the image are. This is the same as on a projector, where you can adjust the corners of the output to properly match the screen you're projecting onto.
Alpha Key
Alpha keys are a bit complicated. On NDI sources, you can simply press the checkbox to enable it. But on physical SDI outputs, you'll need to configure it, as it's not bundled into the same video stream. Instead, it uses a second SDI feed (this is known as a key+fill pair, where fill is the video and key is the second feed) that carries a greyscale version of the feed. Here's an example from ProPresenter's support documentation: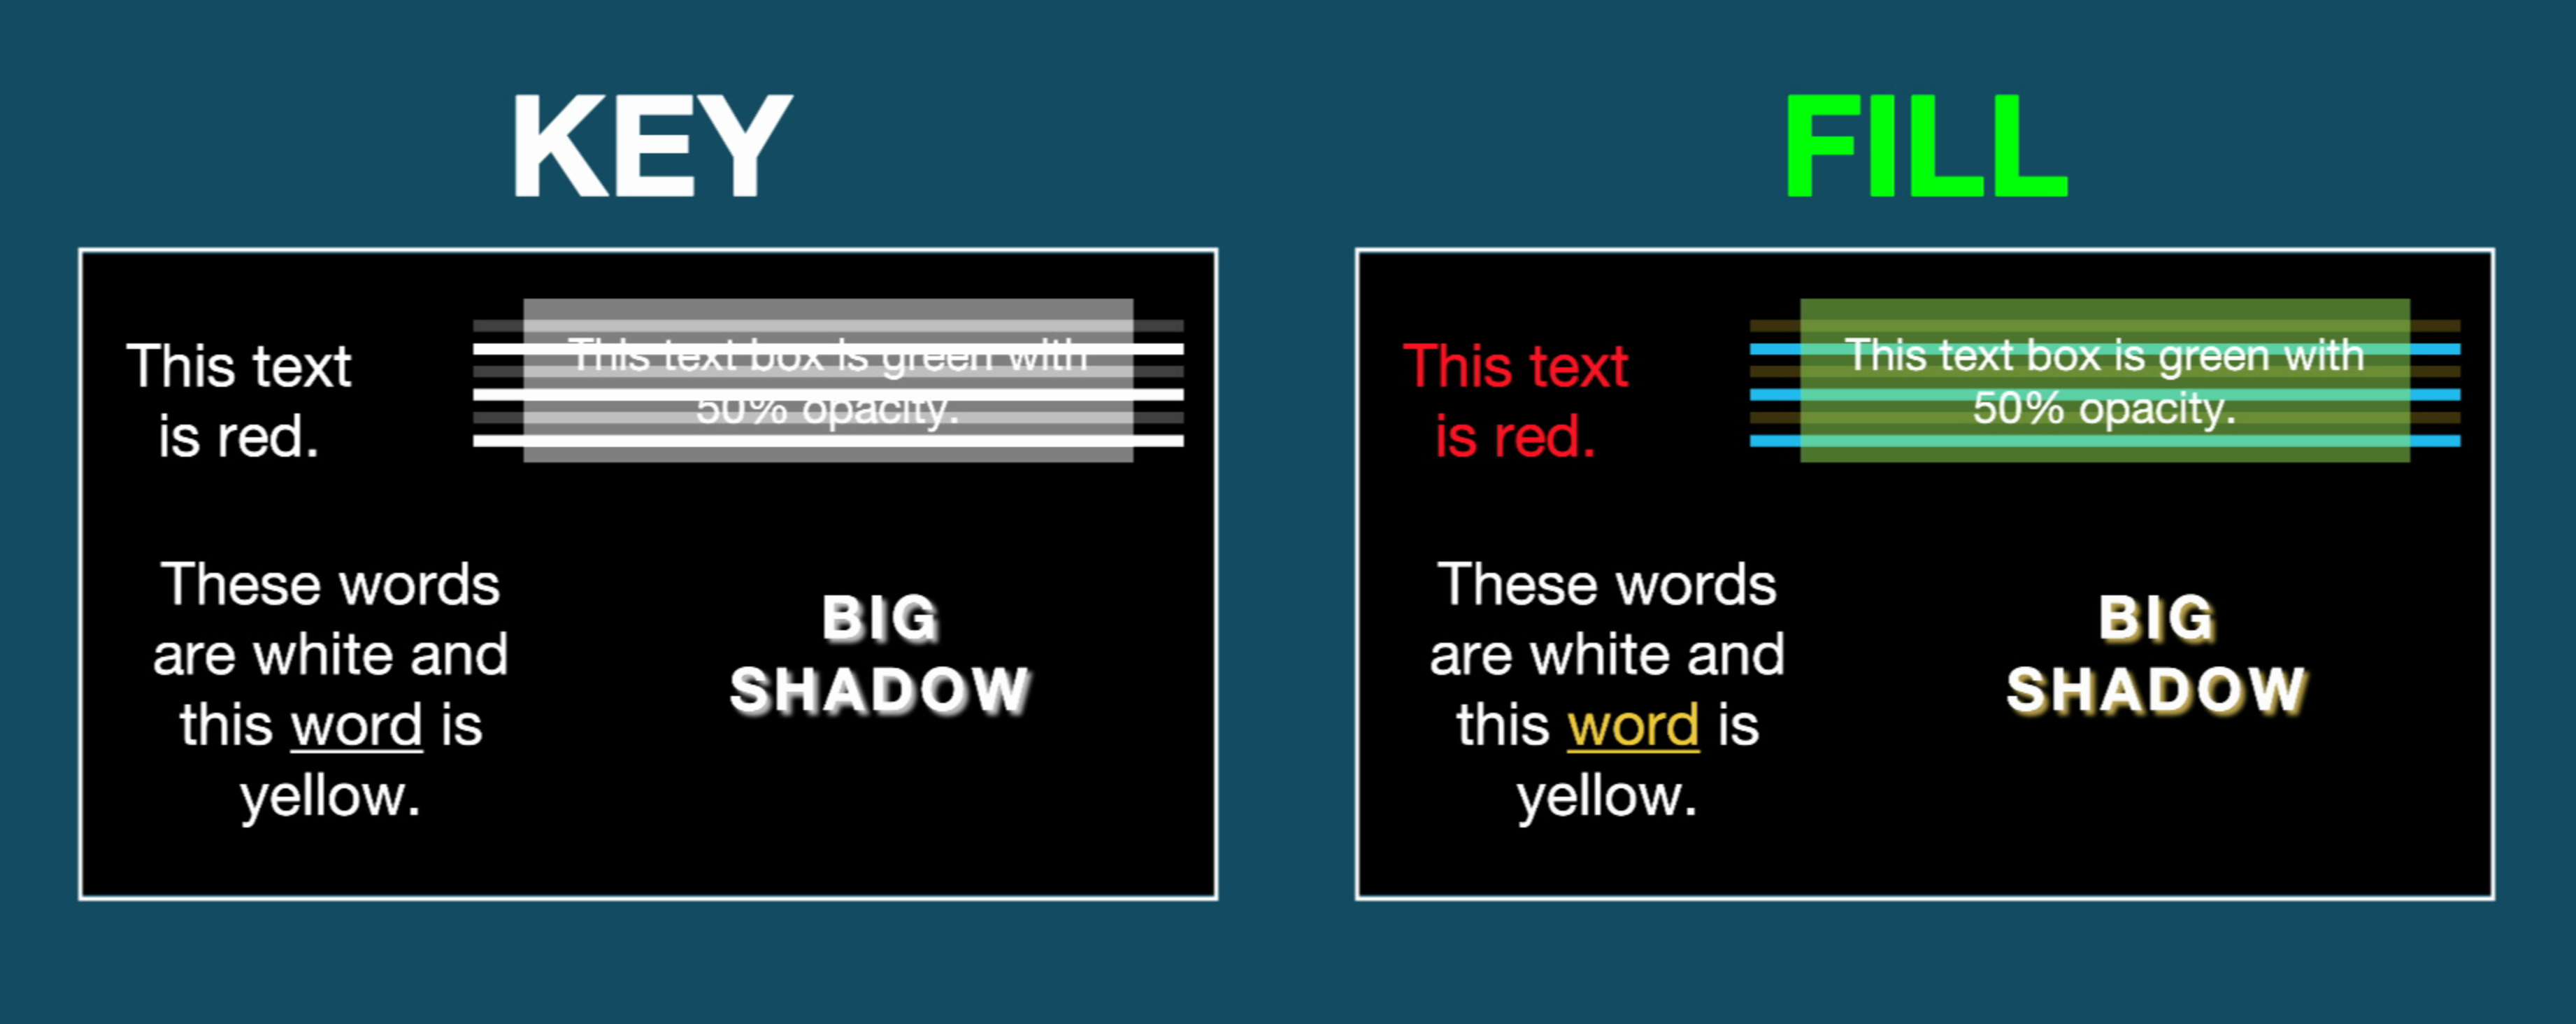
When looking at the key, anything with 100% white is considered "filled" and will receive 100% opacity. The 50% white in the above image will receive half opacity, so the background will be somewhat visible, and anywhere that is black will have 0% opacity (ie. it will be transparent). When we put an image behind that key+fill pair, we get the following:
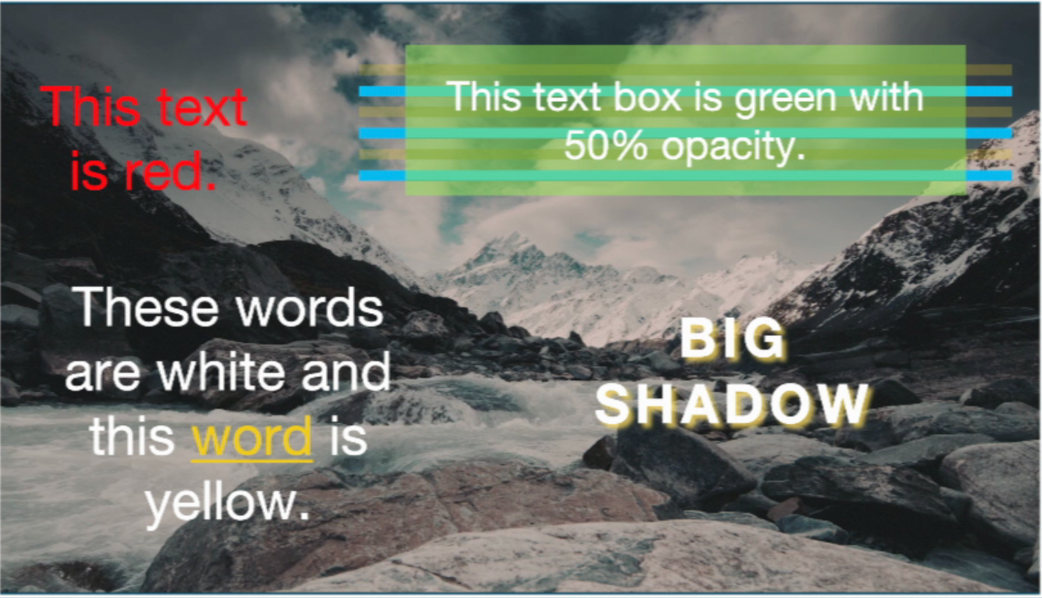
Now that you hopefully understand what the key+fill does, we need to actually configure it. Unfortunately there are some complex hardware restrictions in place. Only certain PCIE cards actually support a key+fill pair, so we have to make sure we use the right output. This also has to be configured in Desktop Video Setup, which handles setting up the PCIE cards and is out of scope of this writeup.
There are 3 options for alpha keying; None, Straight, and Premultiplied. Explaining these is somewhat involved, so if you want to understand what straight vs premultiplied does, I'd suggest reading Premultiplied-and-Straight-Keying. For our purposes we'll use straight when doing a key+fill pair. We'll set the key type to External instead of Internal (which is what assigns it to the second SDI cable), and blend can be left at 100%.